Tuesday, July 4, 2017

Recent Painting (A filler post)

I need to post more frequently on this blog, but it's been a rough day already (it's only 11:00 am and already it's turned to shit), but I figured I've got a ton of pictures I haven't uploaded anywhere, I might as well do it here. So enjoy some of my work:

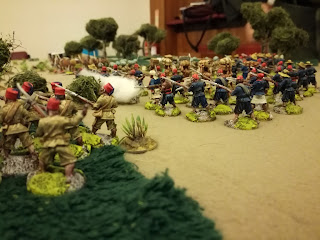
10mm French infantry, for the 1870 Franco-Prussian War. I haven't played it in more than a year, and like an idiot I sold all the models I already had for the game, but Bloody Big Battles is, hands down, one of my favourite wargaming rulesets, and I'm slowly re-building my collection here in the UK so that I can once again play. (Miniatures are from Pendraken)


6mm Napoleonic Bavarians (from Baccus miniatures). I've painted a few of these myself, but they aren't pictured here. I've also begun to slowly build up my collection of terrain, especially smaller scale stuff for 6mm/10mm games, and here are the beginnings of what will eventually be a mighty forest. Eventually. Amazon.co.uk has a ton of really cheap, chinese made model railroad scenery.


James' cat, River. She likes to hang out wit me while I paint, but sometimes she 
wants 100% of my attention, which isn't exactly convenient, but IS adorable.


28mm WWII Soviet Scouts, painted by commission for my friend Mark. Here we see them infiltrating a railroad station in eastern Germany, circa 1945.


And on another flank of the same battle, Soviet Assault Engineers, Also painted by me for Mark, advancing behind the cover of a T-34 (which I did not paint.) These assault engineers are some really tough soldiers, being not only veterans with access to the best weaponry in the Red Army, but wearing body armour, which in the tradition of Ned Kelly is basically just 40+ lbs of steel plate.


And the latest addition to Mark's WWII Russians, some Naval Infantry! These were a lot of fun to paint, since it was such a change from the drab khaki and green of most WWII uniforms. The Russian navy found itself bottled up in port for most of the war, and since the need for trained and disciplined troops was so great, some 400,000 Russian sailors would eventually find themselves pressed into service as infantry. The Germans, Hungarians, Finns and Romanians who fought against them soon gave them the nickname 'The Black Death'

A big, 4 player game of Firestorm Armada, my favourite spaceship-combat game.


Monday, July 3, 2017

Spearhead: Modern- West Germany, 1985, Part 3

I got back onto this blog of mine to see if I'd posted any good pictures recently, since a new coworker is interested in Wargaming, and I thought I'd link him to this to take a look. Turns out I never actually posted part 3 of our Cold-War-Gone-Hot Modern Spearhead game. It's been Quite awhile since this game happened, so the details I write below each picture might be a little bit... fuzzy compared to the previous posts, haha.


Here the... I want to say it was the Irish Guards and the 17th/21st Lancers by-passes the weakened Soviet defences of the II/290th Motor Rifles, who are still being ground down by the Highlanders.


Reinforcements at last! T-80 battle tanks arrive to aid the Soviet 
Motor Rifles battalion guarding the strategically vital airport.


More T-80 main Soviet battle tanks arrive to try to blunt the American onslaught, but
 they are sorely outmatched by M1 Abrams and their Bradley support.


A battalion of T-80s face off against the Challengers of the 17th/21st Lancers...


... and find that Soviet steel is no match for the might of the British armoured cavalry!


It didn't take long for the entire battalion to either go up in flames or run like hell.


The long line of T-80s, a full regiment of them, deploys along the ridge-line to support their beleaguered colleagues of the  I/290th, who were rapidly being overrun by the Americans.


The defending Soviets find themselves caught in a ring of steel, 
slowly but relentlessly drawing closer to the airport.


British and American mechanized infantry begin their assault on the elite soviet Paratroopers...


Who, thanks to their abysmal dice rolling, fall apart like a wet paper sack. I mean I really and truly was shocked at how quickly Soviet resistance fell apart against the NATO attack. So, the result of the battle was a resounding NATO victory. Despite a fair few casualties, their losses were almost nothing compared to those suffered by the Red Army. All in all, it was an absolutely brilliant game.

Afterwards, I took a picture of the NATO commander's battle plan, which I 
obviously was not privy to during the course of the game.

Monday, March 27, 2017

Spearhead: Modern- West Germany, 1985 Part 2

Continuing from last time: The Soviets defend their recent territorial gains against a NATO counterattack! 

Some of my chicken-scratch planning on a hand-drawn map.

Plans for the I/290th and III/290th

Hind helicopter support awaiting orders at the Airport.

Andy's British forces begin their advance, spearheaded by his light Reconnaissance units...

...Who walk straight into the killzone of the dug-in and well-prepared II/290th Motor Rifles! Platoons of mechanized infantry are arrayed in line, from the small hill through the woods, with more in the village behind them. A platoon of ZSU 23/4s is dug in behind the woods, providing anti-aircraft cover, while self propelled guns have a beautiful line of fire in the bottom lefthand corner of the picture.

The best combination is a well-layed ambush, a helping of luck, and phenomenal dice rolls. My troops were well-placed, I got lucky in that the British forces came in Exactly where I expected someone to, and that I rolled phenomenally well. I killed about 3/5 of the force outright, and the rest skedaddled, scattering and running pell-mell off the board.


The Americans begin to move onto the board from the south-western road. None of my forces are in an immediate position to oppose them, but the crossroads are defended by I/290, and now I know that I can free up the III/290 to move to their aid.


M1 Abrams and Bradleys roll forward.


Now that they know where the enemy are, the Queen's Own Highlanders dismount and advance on the Soviet enemy. They meet with better success than their recce counterparts.


As they come into spotting range, we deploy/reveal our brave Soviet defenders. Dug in on the hill and in the town, however the Americans are a far tougher nut to crack than the British. 

This is where having the T-80 battalion attached out to the infantry would have helped us immensely. I knew that we had an entire regiment of T-80s in reserve, but they hadn't been set out on the table, so I mistakenly thought that the handful of T-80s sitting out there were the only tanks I had. I needed their heavier guns to oppose the M1 Abrams of the Americans, and they would have helped immensely against the British Chieftains as well.


The armored column advancing on the Soviet held ridge line.


The soviet held ridge line, mentioned above! I had a battalion of 2S1 Self-propelled artillery that I detached out, so that each infantry battalion had two bases (so two batteries? or gun sections? whatever) to provide direct fire support.

The RAF is on hand to provide support to the infantry attack on the northern front


The Americans come on in a mighty wave of troops and vehicles! The Soviet commander, desperate to slow their inexorable advance, calls in an entire regiment of MiG-27s, who... kind of under-perform, to be honest. 1/3 of their number are driven off by AA fire, and the have little impact.


And on the northern flank of the battle, the Highlanders assault the motor-rifles in the woods, steadily grinding them down.


A view of the massed American forces, moving into position for a final assault on the soviet defences around the crossroads. The III/290 has finally linked up with the first battalion, but both are taking heavy casualties from American tank-fire.


And that's all for now! Next time, we'll see how the two-pronged NATO attack plays out.


Spearhead: Modern- West Germany, 1985 Part 1

This past Saturday at the Tyneside Wargames Club, I got to participate in a game of Modern Spearhead that Andy and Ian were kind enough to put on. I was the Soviet commander, and Ian and Andy commanded my American and British foes, respectively.

Our scenario revolves around a disjointed NATO counterattack to reclaim a West German airport, seized by a regiment of Soviet Guards Airborne (all seasoned veterans of Afghanistan), and a Motor Rifle regiment of three battalions in support. The NATO forces are American Cavalry and a British ..... consisting of the Queens Own Highlanders, the Irish Guards, and the 17/21st Lancers armoured support.

The far side of the table, the airport is visible in the distance. The roads leading into the center of the board are all possible entry points for the NATO forces. Their attack is poorly coordinated, so their point of entry was randomized, meaning the defenders didn't know where their foes would be coming from anyways.


And from the opposite side of the table (Where the Soviet players were seated.) Our only objective was to hold the airport until the end of the game. Our forces included a Motor Rifle regiment, which consisted of three battalions of infantry in BMP-2s and a battalion of T-80s (which I didn't realize we had access to right at the start, so instead of dividing them amongst the infantry battalions, they were off-table and only arrived far later in the game, a glaring error on my part.)


A close-up of the Airport. Very nice models, you can even see the little Lufthansa sign on a building.


The village/town at the crossroads. 

My favorite thing about the Spearhead rules is that you have to draw out a map and coordinate an actual battle-plan, and your units and sub-commanders have to follow those plans. You can attempt to change their orders once battle is joined, but it hinges on a dice roll. Obviously more flexible armies like NATO have an easier time of changing their orders on the fly than the Soviets.

The Soviet deployment has the Guards Airborne regiment garrisoning the airport, and the Motor Rifles regiment deployed in a sort of broad arc around it. I/290th was stationed at the crossroads town, and on the ridge nearby. If the airport is on the eastern side of the board, II/290th was deployed to the north-west, defending along that road. (Our forces were hidden from the NATO players, and our troops were all dug-in). III/290th was just south of the airport.

Some of the British forces, including air support.


British Chieftan tanks, of the 17th/21st Lancers!


The Soviet forces available initially. Three motor rifle battalions, an airborne regiment, some self-propelled artillery, and a battalion of T-80s who were late to the battle. 


We also had an entire regiment of MiG-27 'Flogger' ground attack fighters in support, along with some HinDs based out of the captured airport.


2S3 Self-propelled artillery in the foreground, with the motor-rifle battalions behind them. Note that each base in this scale is a platoon.

That's all for now, next post will have the start of the battle and some action pictures. Stay tuned!


Friday, November 18, 2016

A SECOND post, from England!

Dang, I'm bad about updating this blog.

Plus we're about to go to Liverpool for the weekend.

So, what I'm going to do now is upload all the pictures of games that I've got sitting around, and then maybe later I'll come back and put captions on them and organize them and all that. Because there are a fair few of them.

Wargaming in England is incredible, there's easily 4 or 5 different clubs that meet throughout the week. I regularly attend 2 or 3, and it's been an absolute blast.